
Within this article:
• Getting Started
• Logging In & Adding Administrators
• Navigating the Administrator Portal
• Rostering Users & Classes
• Setting Up Single Sign-On or LTI (Optional)
• Providing Teachers & Students with Login Instructions
• Day-to-Day Responsibilities
• End-of-Year & New Year
• Troubleshooting & Getting Help
1. Getting Started
Once GSEonline access has been purchased, a digital account admin must be selected.
Receiving a Digital Account:
Once the digital account admin has been selected, a District Level account will be created on the Administrator Portal and login credentials will be provided by the support team. If you have not received your login credentials, please submit a help ticket via the chat bot.
Digital Account Admin Responsibilities:
Create and manage users (students and teachers) and classes, distribute content licenses, and provide login instructions to users. The digital account admin can also create additional administrator accounts, reset user passwords, and complete end-of-year and new year tasks.
2. Logging In & Adding Administrators
Navigate to the Administrator Portal and login using the credentials provided by the support team.
Create Additional Administrator Accounts (Optional):
Once logged in, you can create additional administrator accounts by navigating to the Admin Center. The additional admins can manage the district the same way as the original account admin.
Note: When logged into a District Level account, you can only create District Level administrator accounts.
3. Navigating the Administrator Portal

- On the Distribute Content page, you can distribute content to classes and students and see content information.
- On the Users page, you can create and manage users and classes.
- On the Analytics page, you can view data regarding licenses, usage, interactivity, and more.
- On the Schools page, you can view license and distribution information about all schools within the district.
- In the Admin Center, you can create, manage, and view administrator accounts.
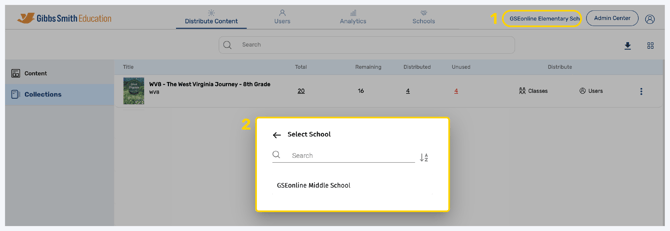
Note: You can only manage one school at a time from a District Level account. Use the Switch School View tool to switch between schools.
4. Rostering Users & Classes
How you roster users and classes will depend on your chosen rostering method. You will work with the support team by providing and receiving information for the configuration.
View guides on the supported rostering methods below.
• Rostering Methods
• Manual Rostering
• ClassLink
• OneRoster
• PowerSchool Universal Rostering Plugin
Frequently Asked Questions:
• Rostering FAQs
5. Setting Up Single Sign-On or LTI (Optional)
Note: If you have chosen not to use a single sign-on or LTI method, then you may proceed to Step 6.
How you setup single sign-on or complete an LTI configuration depends on your chosen single sign-on or LTI method. You will work with the support team by providing and receiving information for the configuration.
View guides on the supported single sign-on and LTI methods below.
• SSO Methods
• ClassLink
• SAML
• Google SSO with Manual Rostering
• LTI (Learning Tools Interoperability)
• Schoology
Frequently Asked Questions:
• SSO & LTI FAQs
6. Provide Students & Teachers Login Instructions
How students and teachers will sign in to GSEonline will depend on your chosen sign-on or single sign-on method. View guides on the supported sign-on and SSO methods below.
• Signing in the GSEonline (Email & Password)
• Signing in with ClassLink
• Signing in with Clever
• Signing in with Google
• Signing in with SAML
• LTI (Learning Tools Interoperability)
7. Day-to-Day Responsibilities
On a day-to-day basis, the digital account admin will make updates to classes, users, and admins. This includes setting or resetting passwords, editing class descriptions, adding or removing users from classes, adding new users and classes, and distributing content licenses.
• Managing Content
• Managing Classes
• Managing Users
• Managing Admins
• Creating Users & Classes
• Rostering
Note: You can only manage one school at a time from a District Level account. Use the Switch School View tool to switch between schools.
8. End-of-Year and New Year
At the end of the school year old users and classes must be removed and content licenses must be revoked from them. To prepare for the new year, new users and classes must be added via your chosen rostering method. Once added, content licenses can be distributed to them.
End of Year
• End-of-Year Process
• Bulk Revoking Content
• Bulk Delete
New Year
• New Year Process: Automated Rostering
• New Year Process: Manual Rostering
• Keeping Teachers & Removing Students from Classes
• Redistributing Content from User to User
• Transferring Students
9. Troubleshooting & Getting Help
When issues or questions arise, there are a few options for troubleshooting. Start by reading our FAQs pages to get help with the most common issues. If you need additional support, you can reach out to the support team by submitting a help ticket via the chat bot.
• FAQs